Adding a Custom Domain
This article goes over the SSL and custom domain verification process.
Previously, we used to manually send SSL certificate renewal notices to every manager on our platform. However, starting from mid-2023, we made a change to the SSL certificate renewal process.
Now, managers have the ability to verify their custom domain and SSL certificates directly from the manager dashboard. This feature automates the renewal process, eliminating the need for managers to manually confirm the renewal and receive annual SSL certificate renewal notices via email.
Please note that the renewal notices for the previous manual renewal method are still being sent. If you receive a renewal notice asking you to confirm your site's SSL certificate renewal from Amazon Web Services (AWS), you can still do so as long as the notice hasn't expired. However, it's important to remember that you will still need to manually renew the certificate each year.
Required information for the new SSL Renewal and Custom Domain Verification Process:
To complete the steps outlined in this article, your company must have ONE of the following:
-
A subdomain of Verivest.com, such as skyline-properties.verivest.com
-
A custom domain owned by the manager
💡 You will also need to know who manages your company's website and have the login credentials for that site manager.
Step 1: Adding A Custom Domain
To add a domain in the manager portal, follow these steps:
-
Visit your Manager dashboard
-
Click on Settings
-
Enter the domain into the custom domain field. For example, skylineproperties.verivest.com (do not include HTTPS://)
-
Click "Add Domain"
💡 If any errors or typos occur, please make sure to delete the domain by clicking "Delete Domain" before proceeding.

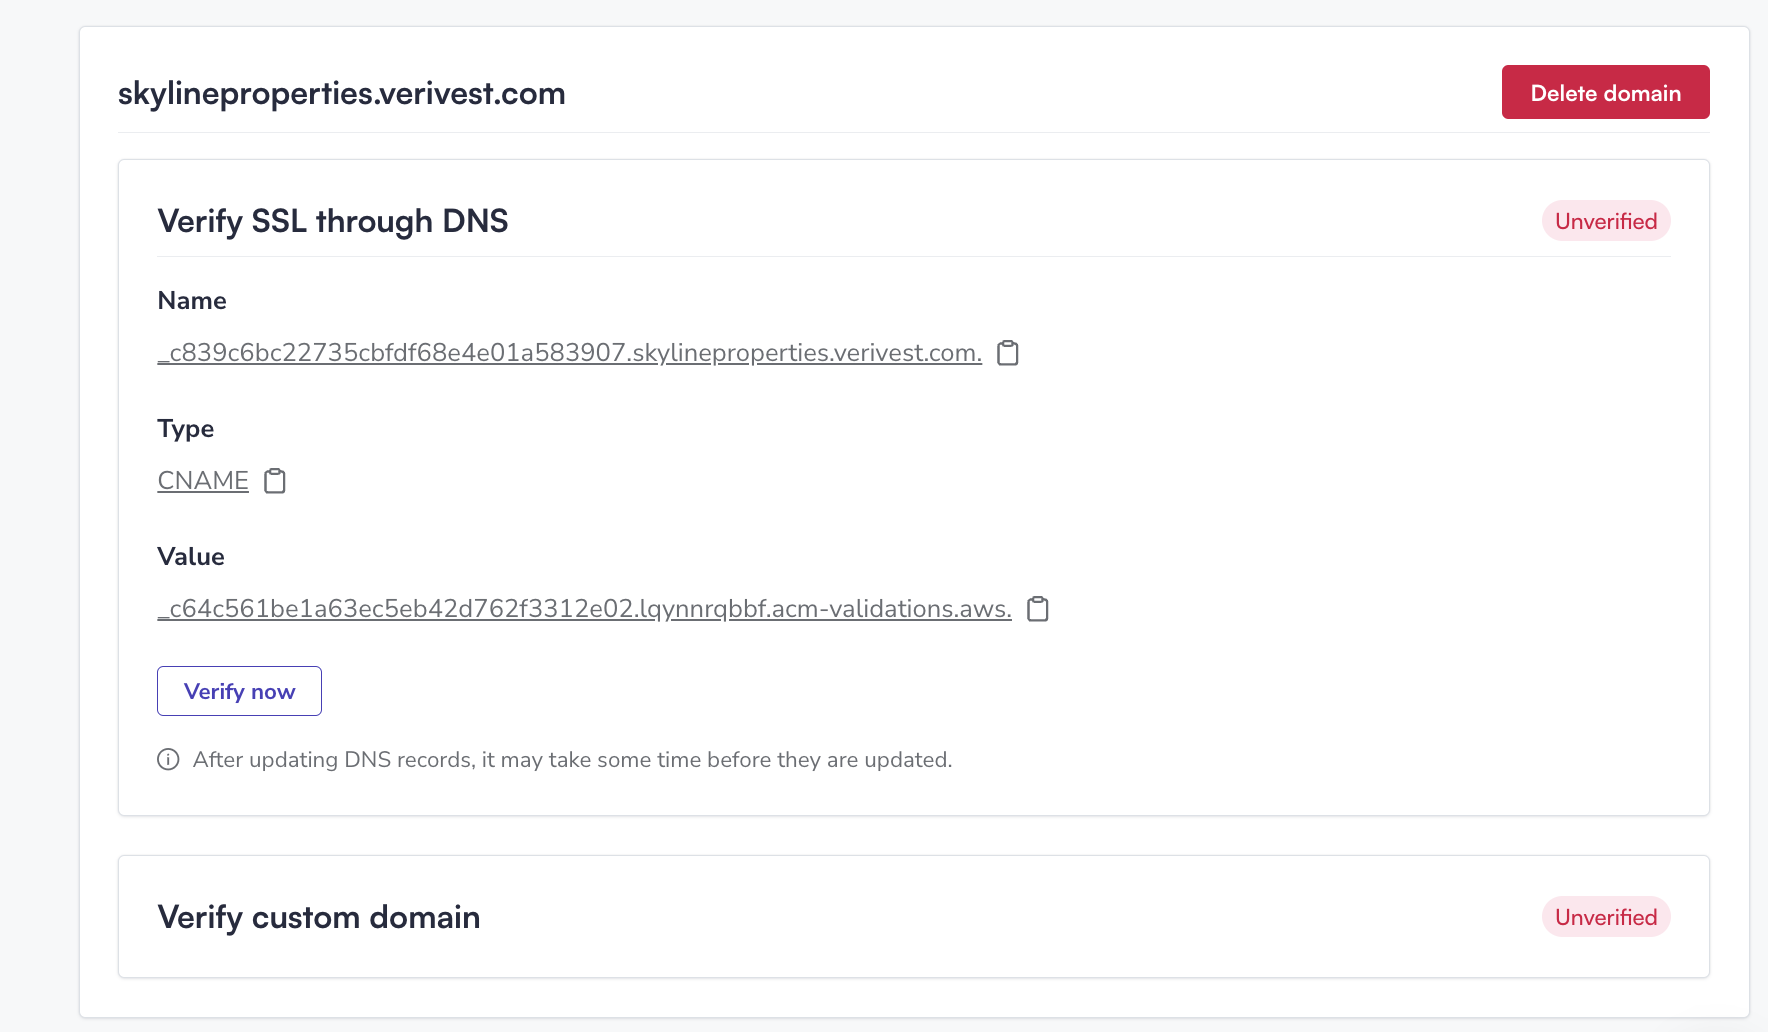
After you enter your company's custom domain in the portal, SSL certificates will be generated in AWS and displayed in the manager dashboard. These certificates are necessary for the verification process and will be shown in the portal. Each record will have a clipboard icon next to it, making it easy for you to copy and paste the records into your DNS manager for the provider.

Step 2: SSL Certificate Verification Process
To complete the SSL verification process, follow these steps:
-
Visit the Settings page in your manager dashboard.
-
Locate the three records that were generated after entering your company's custom domain into the "custom domain field." (name, type, value)
-
After accessing your website host's DNS system, find the option to "add a record" and choose CNAME as the type of record you want to add.
-
Copy and paste the records generated from our portal into your company's web host-provided DNS system exactly as they are shown in your manager dashboard.
The sections that need to be copied from the manager dashboard are:
-
-
Name= either subdomain or normal domain
(you might need to leave out the ".com")
-
Type= CNAME
(copy exactly as shown in our portal)
-
Value= May be displayed as "Target" on your providers site
(copy exactly as shown in our portal)
-
5. Once you have copied all three records into the manager's provided DNS system, click "Verify Now" in our portal.
Please note: The verification can take anywhere from several minutes to a day, depending on your provider. If the verification fails on the first attempt, wait an hour and then try again.
6. Once the SSL Certificate verification is complete, you’ll see the verification status update from unverified to Verified in the Verivest portal.
Step 3: Verifying the Domain
After the SSL certificate is verified, you'll need to verify the manager's custom domain.
To verify the manager’s custom domain, copy the three sections below from our portal and paste them into the manager's provided DNS system, just as you did before.
To complete the domain verification, follow these steps:
-
Visit the Settings page in your manager dashboard.
-
Locate the three records that were generated after entering your company's custom domain into the "custom domain field."
-
In your website host's DNS system, find the option to "add a record" and choose CNAME as the type of record you want to add. Then, simply copy and paste the records generated from our platform into the appropriate fields.
-
Copy and paste the records generated from our portal into your company's web host-provided DNS system exactly as they are shown in your manager dashboard.
The sections that need to be copied from the manager dashboard are:
-
Name= either subdomain or normal domain
(you might need to leave out the ".com")
-
Type= CNAME
(copy exactly as shown in our portal)
-
Value= May be displayed as "Target" on your providers site
(copy exactly as shown in our portal)
5. Once you have copied all three records into the manager's provided DNS system, click "Verify Now" in our portal.
6. Click "Make this domain active when you are ready for investors to use the site
Please note: The verification can take anywhere from several minutes to a day, depending on your provider. If the verification fails on the first attempt, wait for half an hour and then try again.
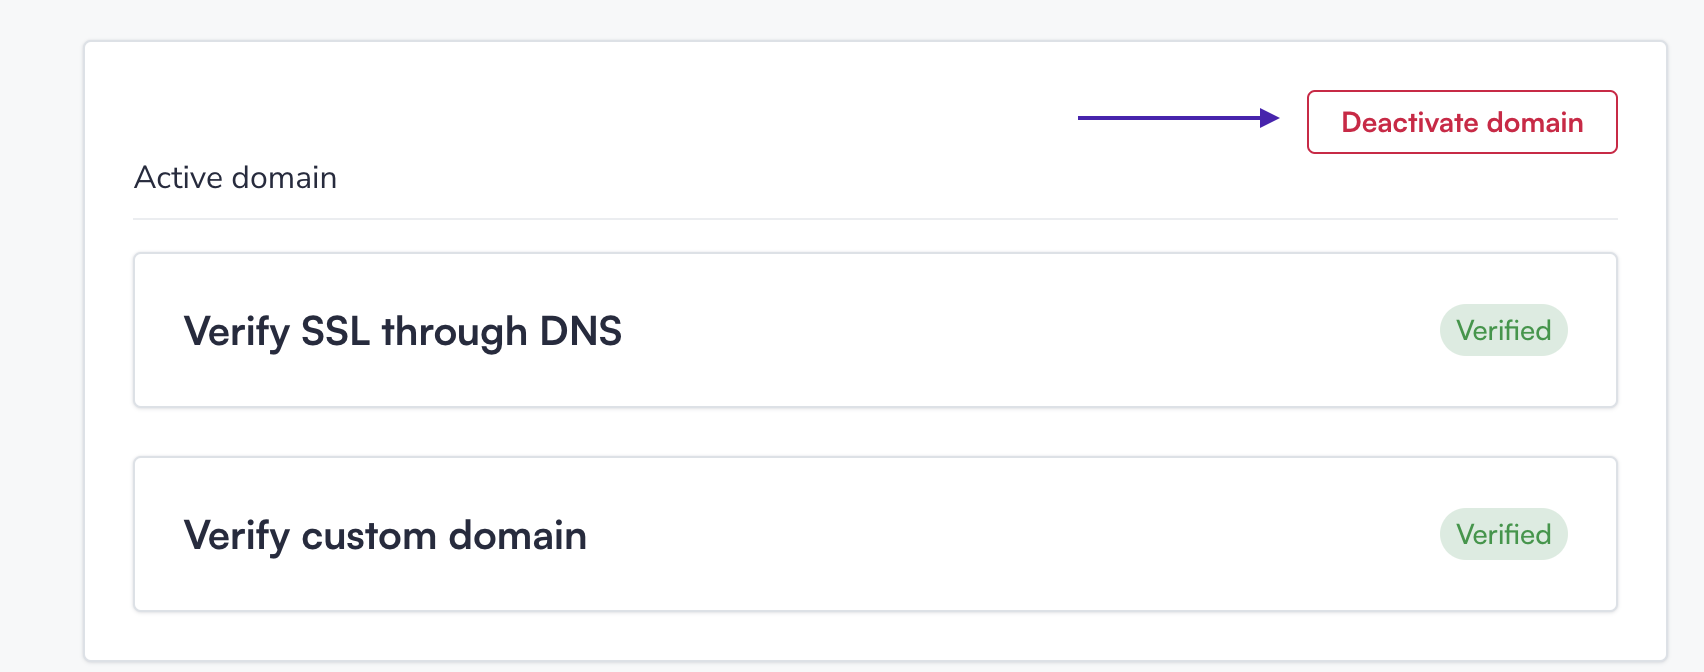
After opting to make the domain active, you should see the confirmation screen below.
Deactivating a Domain
If you need to deactivate a domain that can be done from the manager portal. You'll need to click "deactivate domain" from your dashboard settings.

Additional Information
-
Your team has the option to verify the SSL certificate and domain, and delay its activation until you are ready for investors to use the site. This allows you to choose when to go live with the specified domain.
-
If you already have an active site and plan to change it, we recommend that your team verifies the SSL certificate and new domain in our portal beforehand. This will help ensure a smooth transition when the profile/fund is ready to go live and minimize any potential downtime.
-
The process of setting the domain may vary depending on the provider. Once you start inputting data into your provider's DNS manager, the step-by-step process may differ. Most providers will require you to copy the certificates generated from our portal into a section called "DNS Zone" or "DNS manager."
Need help? Contact support@verivest.com
![Verivest-Logo---Blue-Mark---Dark-Text.png]](https://support.verivest.com/hs-fs/hubfs/Verivest-Logo---Blue-Mark---Dark-Text.png?height=50&name=Verivest-Logo---Blue-Mark---Dark-Text.png)